
![]() Re-homing represents the ability to move a call from one server to another, without causing any disruptions in the endpoints call experience. Although this was already possible using previous versions of OpenSIPS, the setup required to comply with certain network constraints, making it impossible to use in geo-distributed setups. However, starting with OpenSIPS 3.0, you are now able to do SIP calls re-homing between different locations / DCs for:
Re-homing represents the ability to move a call from one server to another, without causing any disruptions in the endpoints call experience. Although this was already possible using previous versions of OpenSIPS, the setup required to comply with certain network constraints, making it impossible to use in geo-distributed setups. However, starting with OpenSIPS 3.0, you are now able to do SIP calls re-homing between different locations / DCs for:
- fail-over purposes
- calls re-balancing (real-time balance on-going calls)
- calls drainage (drain the calls of a server for maintenance)
And all these without any network dependencies, and without any additional networking tools! Throughout this article I will describe you how to achieve this.
Former Network Constraints
As stated earlier, moving calls from a one OpenSIPS instance to another has been possible for more than a decade by leveraging different mechanisms (such as database replication, or later on, cluster replication). However, all these solutions rely on an external tool that is able to move network traffic from one instance to the other. Common tools for doing that are vrrpd, or keepalived, both being able to make use of a Virtual IP that can be shared between multiple instances, but only one of them being active at a certain time. These tools come with certain restrictions/requirements, such as:
- you need an extra route-able IP that should be used as Virtual IP
- the router has to be able to allow and route multicast traffic (in case of vrrpd)
- the router has to accept Gratuitous ARP when a fail-over happens
- fail-over has to be done within the same routing scope (AS), so using this technique it is impossible to do a geo-location fail-over
Although these requirements are not hard to meet (except for the last one) when you are using your own virtual machines, or even bare-servers in a rack, and own the router that ensures connectivity for your platform, it might become a bit more complicated when you run your platform in a cloud, where you have additional restrictions:
- you can’t use any IP you wish, it has to be pre-released by your cloud provider, otherwise it won’t be routed
- you need to acquire an extra IP (unless you have your own subnet), that costs extra money (per month)
- some cloud providers do not allow Virtual IPs, and you need to use other mechanisms such as Elastic IPs in AWS. Additionally, this has extra costs per month
- you have to learn each cloud provider’s APIs and management tools for networking adjustments
Listing these constraints made us wonder how we can overcome them, and make it easier for developers to achieve fail-over in these scenarios. And the answer came shortly: instead of moving the IP to a different instance (this way a SIP client doesn’t notice the server has changed), why don’t we just tell the SIP client we’ve changed our IP? This is perfectly compliant with the SIP RFC and already supported by (I’ll admit, some) SIP clients. But doing that will ensure us we can have re-homing in any network constrained environments.
Re-Homing
Modification of an endpoint’s Contact during a call can happen quite frequent, for example when a mobile phone changes a WiFi network, or moves to a 4G connection, or perhaps a hard phone triggers a DHCP requests and gets assigned a different IP. From SIP point of view this is implemented by triggering a re-INVITE (or UPDATE) with the updated Contact.
Note that we are not allowed to change the Route set of an ongoing call, we are only allowed to change the Contact header. This means that we need OpenSIPS to behave as a SIP endpoint, thus topology_hiding module has to be engaged for these calls.
To understand how re-homing works, consider the following scenario: we have two OpenSIPS instances, one SIP phone, and one Media Server. The SIP phone makes a call to the Media Server, like in the diagram below:

In this diagram, the call between the SIP Phone and Media Server is established, and both endpoints “learn” the remote target as being OpenSIPS Instance 1: Media Server in INVITE (2) and SIP Phone in 200 OK (4). This means that whenever an in-dialog request (re-INVITE, UPDATE, BYE) is generated, both Media Server and SIP Phone will send it to C1. Of course, this is problematic when Instance 1 crashes, or becomes unresponsive. That’s why, when this happens, after we choose the new OpenSIPS instance, it needs to trigger a contact update like in the following diagram:
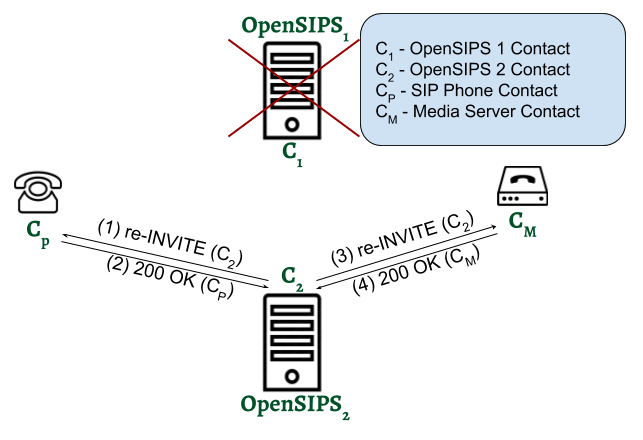
After the re-INVITEs complete the SIP Phone would have learned the new contact for the call in re-INVITE (1), and Media Server in re-INVITE (3). Therefore, all the following in-dialog requests will be sent to Instance 2 (C2).
Implementation
In terms of implementation, a requirement is to have all OpenSIPS instances clustered, and having their ongoing dialogs replicated. This blog post describes how this can be achieved. So if you want to develop re-homing, make sure you have your dialog cluster setup before proceeding. Note that we won’t be using an external tool to manage the VIPs, we’ll just use the locally assigned IPs of each machine.
Preparing calls for re-homing
Since OpenSIPS may use different listeners for different purposes (for example in our scenario, OpenSIPS may use a public IP for talking to the SIP Phone, and a private one for the internal Media Server), we need to create an aliasing scheme between the interfaces of each running instance. This can be achieved using the new listen tag feature that has been added in OpenSIPS 3.0. Your configuration file should look like this:
# on OpenSIPS Instance 1
listen = udp:PUBLIC_IP1 tag PUBLIC_INTERFACE_TAG
listen = udp:PRIVATE_IP1 tag PRIVATE_INTERFACE_TAG
# on OpenSIPS Instance 2
listen = udp:PUBLIC_IP2 tag PUBLIC_INTERFACE_TAG
listen = udp:PRIVATE_IP2 tag PRIVATE_INTERFACE_TAG
Make sure the tags are the same for the interfaces that have the same purpose in the topology.
Next, when the calls come in, we need to:
- Create a dialog that is going to be replicated
- Set the sharing tag for the dialog, to make sure there’s only one instance acting upon pinging and timeout
- Engage topology hiding, otherwise we wouldn’t be able to change our Contact
In terms of configuration, your initial INVITE handling should look like the following snippet, on both OpenSIPS instances:
if (is_method("INVITE") && !has_totag()) {
    create_dialog();                # step 1.
    set_dlg_sharing_tag("service"); # step 2.
    topology_hiding();              # step 3.
}
And that’s it, you have you’re re-homing successfully configured!
Trigger re-homing
Whenever the of re-homing happens, you need to run a script on the newly assigned instance that needs to do two things:
- change the instance that has the active sharing tag to the new machine – in our example, the script should be ran on instance 2 and should call:
opensips-cli -x mi clusterer_shtag_set_active service/1
- for each dialog that you want to migrate (because of course, you may choose a subset in case of re-sizing), you need to trigger the re-INVITE using the dlg_send_sequential command; we should use the challenge mode, and use the SDP bodies that we’ve previously advertised (outbound). The command for a dialog should look like this:
opensips-cli -x mi dlg_send_sequential \
        callid=$DIALOG_CALLID  \
        mode=challenge         \
        body=outbound
Other Considerations
This new re-homing approach opens a lot of interesting discussions and implementations. For example, using this scheme you can easily setup fail-over between OpenSIPS instances running on the same machine and using the same IP (of course, different ports) – this was impossible using a VIP! Moreover, you can even partition the dialogs you want to remain on one instance, with the ones that you are planning to move – just use different sharing tags!
Active-active setup can also be easily implemented by using different sharing tags, and instead of assigning the same dialog sharing tag on both instances, you assign different ones for each instance. For example, in the configuration file above, after creating the dialog (step 1.), we set the sharing tags as:
set_dlg_sharing_tag("service1"); # step 2. on Instance 1
set_dlg_sharing_tag("service2"); # step 2. on Instance 2
From this point, you can move the dialogs that have a specific sharing tag assigned from one instance to the other.
Another interesting feature that you may want to implement is media fail-over. For example, whenever you decide that a RTPProxy or RTPEngine server is overloaded, you can power on a new instance and simply move a bunch of dialogs from that overloaded instance. To do so, you need to trigger a re-INVITE towards both endpoints. Make sure you use the inbound body when triggering the re-INVITE, and re-engage RTPProxy/RTPEngine in local_route for re-INVITEs locally generated.
Finally, using this scheme you can add countless number of nodes on the fly, dynamically – all you need to do is make sure you use a different dialog sharing tag for each instance, but the same listener tag. And make sure you synchronize the node with the other active ones before moving any traffic on it.
Conclusions
As you can see, all the ideas above can be easily implemented by tuning bits and pieces of the mechanisms we’ve added in OpenSIPS 3.0, and everything can be done without the need of an external tool for managing the network layer. That’s how easy you can ensure high availability in OpenSIPS 3.0, so go ahead and hack your platform’s fail-over flavor now!
